Introduction
Operating the SestroniX™ Mini_Tone™
Unboxing
Upon unboxing your Mini_Tone™ remove the battery compartment cover on the back of the unit and install a 9v battery. Be sure that the battery wiring is clear and away from the mounting surfaces of the access cover before closing it up. The best way is to use a blunted wooden tooth pick to tuck the wires in between the battery and the case.
If you have ordered the optional rubber boot, slide the Mini_Tone™ into the boot through the open front face with the ¼” jack receptacles toward the open end. Gently lift the tip of the belt clip to go over the backside of the boot.
The device can be clipped on to your guitar strap or onto the provided strap adapter with or without the boot.
To use the strap adapter, install your strap and slide the tear drop shaped hole over the strap nut at the rear of the guitar. Pushing the strap adapter downward, stretch the attached elastic loop over the strap nut to lock the adapter into place.
Use the hook & loop “Thin Tie” to secure the top of the adapter to the guitar strap. Use the supplied second Thin Tie to accommodate thicker straps.
Using the belt clip, slide the Mini_Tone™ into the “U” shaped contour at the top of the adapter until a tight fit is achieved
Plug in
Use a 12″ effects cable to plug your Mini_Tone™ into your guitar.
For guitars with a side mounted jack (Gibson ®, Epiphone ®, Ibanez ®, etc. ) the best option is a “right angle to straight” effects chord approximately 12″ long. Plug the right angle into the guitar jack and the straight plug into the Mini_Tone™ “guitar” jack. For guitars with a face mounted jack, i.e.; Stratocasters ®, a 12″ chord with straight plugs works best.
Plug in your amp or effects board lead into the jack marked “Amp”.
Also works well with most wireless devices.
Use the lower “Thin Ties” to secure the instrument cables.
Adjust your amp as clean as possible
At SestroniX™, we suggest starting with your amp at low volume with the cleanest settings possible. Using a volume pedal is a good option. However, for tube amps, a volume setting of 2 or lower is advised. Most solid state amps work well with a starting point of about 9 o’clock. With modeling amps, select the cleanest sounding model available.
Set all of the amp’s tone controls to 12 o’clock, your guitar tone and volume controls all the way up.
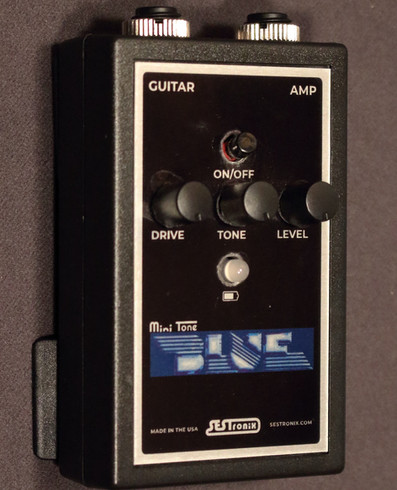
On the Mini_Tone™ press the “on/off” button.
On the Mini_Tone™, adjust the Drive, Tone and Level controls to the desired effect.
Add reverb and make further adjustments as desired.
Touch Sensitivity
On most guitars with humbucking pickups, adjusting the Drive control to about ¾ with the Level maxed out will offer a crisp, clean tone when strummed or picked softly softly, while a firmer touch will produce a creamy overdrive.
Unplugging
Unplugging the Mini’s “Amp” jack at the end of each session will ensure the longest possible battery life. But, at performance breaks, simply pressing the “on/off” button puts the device into “standby” mode which uses the lowest possible consumption.