Introduction
Micro_Tone™ Overview
The SestroniX™ Micro_Tone™ overdrive effect is designed for guitarists who want to grab a guitar and head to a jam session or a gig without the hassle of gathering additional equipment before heading out the door.
The Micro_Tone™ was designed by an engineer/musician for musicians. Simply plug in to a clean or slightly overdriven amp and flip the switch on your guitar with the Micro_Tone™ installed!

The Micro_Tone™ is a full guitar overdrive that has been miniaturized to fit the control access panel of a guitar. The Micro_Tone™ in the de-energized switch position is in “true Bypass” so your guitar always works, even if the battery on the Micro_Tone™ is drained.
Don’t worry if your battery goes dead. A 5 Volt USB charging cable comes with each Micro_Tone™ kit sold. The Micro_Tone™ should be operational from 12 to 15 hours if you remember to turn OFF the switch when you are not using the effect. If you forget, don’t sweat it, just plug in the USB charger cable and in a few hours the battery should be fully recharged.
What you get from SestroniX™
The Micro_Tone™ Kit comes with the following items:
The Micro_Tone™ guitar effect, including the battery
The Micro_Tone™ mounting harness with re-charging connector
USB charging cable
Lexan Sheet of plastic to help position the Micro_Tone™ in the control cavity
Hole marking templates for the Micro_Tone™ and re-charging connector
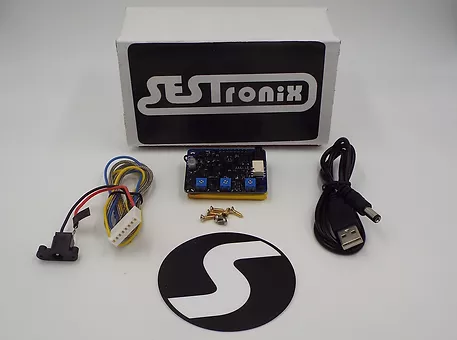
Micro_Tone™ kit
What you get from SestroniX™
Here is what you need to have on-hand to install the Micro_Tone™ in your guitar:
A guitar with a control cavity with enough clear area to fit the Micro_Tone™.
A Single Pole Single Throw Switch (SPST) or push-pull potentiometer installed in the guitar.
Soldering iron and materials
Drill and drill bits
A 1/16 inch Allen wrench
Painter’s tape
A marker that will write on the Lexan panel
Wire ties, wire string
Toggle or push-pull potentiometer
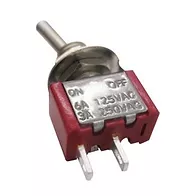
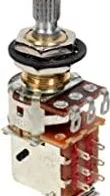
Toggle or push-pull potentiometer
Installation Overview
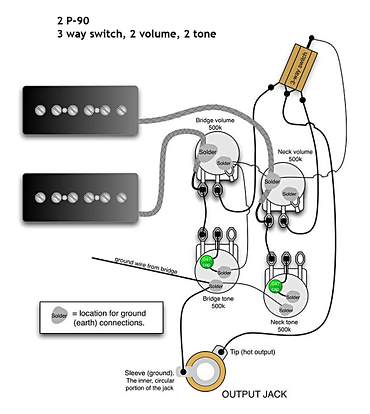
The diagrams show a typical two pickup guitar wiring scheme. The only change to the actual guitar wiring is the insertion of the Micro_Tone™ in-line between the guitar output and the Tip/Sleeve Jack.
The wiring harness/connector (provided) is used to interface the Micro_Tone™ to the guitar. The charger connector is tied to the Micro_Tone™ harness. The remaining connections are the shield grounds and the switch wires to enable the Micro_Tone™.

Installation Step
Remove the cover plate from the guitar.
Trace the outline of the cover plate on the lexan sheet provided in the kit.
Be sure the install the Push-Pull potentiometer or SPST switch in the guitar before finalizing the fit of the Micro_Tone™.
Lay lexan over the access cover cavity in the guitar.
Align the tracing with the cavity.
Use the painter’s tape on one edge of the lexan sheet and tape the back of the guitar. This will maintain alignment as you fit check the Micro_Tone™ Installation.
Lay the Micro_Tone™ itself over the lexan and find a location that the Micro_Tone™ will fit in the cavity without interfering the components or wiring. If necessary, adjust the wire routing as necessary to make room for the Micro_Tone™ body. Remember the Micro_Tone™ 8-pin connector will need to fit also.
Lift the lexan and tape the Micro_Tone™ in the selected location. Let the lexan cover come down into place. This step may need to be repeated until you are satisfied that the Micro_Tone™ and connector will fit without interference.
If satisfied with the location, cut the paper drill template out and place directly over the Micro_Tone™ visible through the lexan. Use a small punch to mark the hole locations.
Mark the hole locations for the charging connector in the same manner.
Remove the lexan cover from the guitar and the Micro_Tone™ from the lexan.
Use a small drill bit the mark pilot/transfer holes in the lexan.
Lay the lexan over the access cover that you are going to use and mark the hole locations.
We recommending installing the Micro_Tone™ and wiring harness using the lexan itself before final drilling to the final access cover.
De-solder the wiring (possibly shielded wire) between the guitar out point the the Tip/Sleeve connector.
The next steps direct the connector soldering. Be sure to trim and dress the wiring to remove the excess wire if desired to make a cleaner installation.
Solder the center conductor on pin 5 of the Micro_Tone™ connector to the guitar out point.
Solder the associated shield on pin 6 to a nearby potentiometer that is tied to the guitar ground.
Solder the center conductor on pin 8 to the tip connection point of the Tip/Sleeve connector.
Solder the associated shield on pin 7 to the Sleeve connection point of the Tip/Sleeve connector.
Solder the Blue and Yellow wire to the SPST switch or the push-pull potentiometer installed in the guitar. Solder wires to either terminal.
We recommend testing the installation at this time before tying in the harness.
Plug the harness into the Micro_Tone™ Connector.
Plug in the guitar to an off amplifier. Set the SPST switch or the push-pull switch to the open position. (You can toggle the switch and verify the Green/Red LED Green or Flashing Red. Flashing Red indicates the battery needs to be recharged.)
The operation LED should be OFF. Turn on the amplifier. The guitar should sound just like it did prior to Micro_Tone™ installation. Remember that the only wires effecting the Micro_Tone™ are the shielded center conductor wires between the guitar out and the TIP/Sleeve connector.
The guitar should be working as normal. Turn on the SPST switch or the push-pull switch. You should hear the Micro_Tone™ overdrive.
Adjust the DRIVE, TONE and LEVEL pots to taste.
Tie the harness into the guitar cavity with wire ties or string.
Drill the final cover assembly and install the Micro_Tone™ and the charging connector.
Plug-in the Micro_Tone™ harness and install the access cover.
Final test.
Enjoy the experience of having a great sounding overdrive effect in the guitar!